Monday 30 July 2012

Tourmaline Flower Necklace

To give you some relief from the interlocking rings of the last few posts (and to give me a break too!), here is a necklace I've been working on based on the layered flowers from Edwige Renaudin's book.

Yarnplayer's Tourmaline thread is one of my favourite ever so I thought I would use it to make a necklace.  I happened to have some nice green semi-precious rhyolite which matched the thread very well.  I like adding stones to tatting for jewellery as I find it gives the lace just a nice bit of weight to keep it in place.

Motif 17 of 25-motif challenge

I'm very pleased with how this turned out.


Best wishes,

Sunday 29 July 2012

Still Interlocking...

I played with the pattern a bit to come up with something that looked "fuller" with the shuttles, like Rachel's design does with the needle.

What do you think?  An improvement?

Motif 16 of 25-motif challenge

But don't look too closely... I still got that last interlocking ring wrong!  I don't know why it's so difficult to get right; it's like I've got a mental block about it.  It all works fine until that last ring which needs to connect to two other rings (with one side going over and one side going under).


Oh dear...
More work required despite all the tatting shrapnel that litters my work table!


Hope you're all having a nice weekend.

Best wishes,

Friday 27 July 2012

Rosalie

Here is my attempt at Rosalie (by Rachel Colvin Jackson) with its interlocking rings centre.  I have to say that I don't like it half as much as I like Rachel's.  Hers looks gorgeous! - mine looks ordinary.  The shape worked up differently (due to threads? shuttle instead of needle? Beads? My tension?).  I think the round seed beads looks better than delicas for this motif.

The first motif on the left is my first attempt but I found my beads were too large and crowding the design too much so I started again with different beads to complete the motif on the right.

Motif 15 of 25-motif challenge

Been practicing the interlocking rings some more... but I tell you, they have a life of their own!  I still can't consistently get it right but I'll keep practicing until I get there.

Meanwhile I will just admire Rachel's Rosalie because it's so much prettier!

Best wishes,

Thursday 26 July 2012

Eureka! Interlocking Rings

I looked at it again with a fresh head this morning and I was also able to view Karen's video to the end and I had another go.  I just had to post again straight away.

Eureka!

Here is my first interlocking rings rosette:


I'm a happy bunny.


Best wishes,

Interlocking Rings

Well, it all started when I saw the post by Rachel Colvin Jackson about her free pattern called "Rosalie" which I thought looked so pretty I wanted to have a go.  But I'm useless with needle tatting!  I tried with the centre motif but I just couldn't get it looking neat and tidy with the needle.  So then I started to search for interlocking rings with a shuttle - can it be done?  Surely it can.

Karen Cabrera to the rescue!  She has a video on interlocking rings with a shuttle - yeah.
Thanks so much Karen!
(Sadly I never got to watch the video to the end as it appears to be jammed... can that happen with YouTube? - I'm still unable to view it at the moment).

So I watch and I try.  I'm not there yet.  But here is the fruit of my labour this evening:


I still can't quite figure out what I'm doing... but I'm doing something!
And I like it.

These interlocking rings are made with one shuttle.

Now I need to figure out which direction I'm going and how to make
six of them going the right way so I can join them into a ring.


Anybody out there more of an expert on this?  Have you tried interlocking rings?  That bit on the left  nearly looks like the Olympic rings which is appropriate at this time in the UK!

Best wishes,

Monday 23 July 2012

Having Fun with Layered Flowers

Still playing around with this flower design (based on Edwige Renaudin's pattern).  I've tried two and three layers, different threads and added beads in different places.

I was wearing the pair tatted with "Macarons" by Tat-ilicious again today.

Sun is still shining - three days in a row!  We are spoiled.


Here's another photo in the shade.  Perhaps you can see the detail a bit better.


Hope the sun is shining on you too, wherever you are (though not too hot for our American friends I hope).

Best wishes,

Wednesday 18 July 2012

Tatting in French - La Frivolité aux Navettes

Although French is my mother tongue, I have learned and have done all my tatting in English.  All my books so far were in English (apart from a couple of German ones).  I thought it was high time I learned to tat in French.  So with the help of Edwige Renaudin and her book called "La Frivolité aux Navettes", I am learning tatting terminology in French.

I have to say I am finding it difficult!  Just because I'm so used to all the English terms, I keep looking at noeud dessus, arceau festonné, anneau fendu et raccord double feston endroit and am forever having to refer to the lexicon!

The exercises and patterns in the book appear more complicated to me just because I can't read them really quickly like I can an English pattern.  Still, I'm learning new things and am finding her book very interesting.  For example, when making the last ring of a flower, if you flip your work under and up to make the last join, instead of over and up, your shuttles end up on a different side of your tatting which is something really useful to know if you are carrying on with the pattern.  This is probably not clear in words, perhaps I'll have to take pictures eventually.

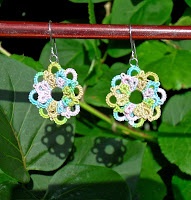
Anyway, here are some earrings I made based on an exercise in the book.  They are tatted in "Macarons" by Jess! at Tat-ilicious.  I like the construction of these which enables you to make all three rows in one go.  I shall be playing with this some more.

Motif no. 13 of 25-motif challenge


The sun was shining for a rare moment
so I went outside to try to take a better photo.

I liked the shadow of the lace on the leaves behind...
but it was very windy and the earrings
wouldn't stay in place long enough for
me to take a good photo!


I don't think the photos do the earrings
or the thread justice.

They are very pretty and look good on.
I'm wearing them now.


Amitiés dentellières,

Monday 16 July 2012

Tatting with Tatsy

Following on from the previous post (please check it out for Marie's wonderful Beaded Shuttle Bag pattern), I decided to make a short video of tatting with the giant Tatsy shuttle.  I thought some of you who haven't tried it may be interested in seeing it in action.


If you click on the YouTube logo in the bottom
right-hand side of the picture, you will be taken to YouTube
where you can view the video in larger format.

As you can see, it's quite a handful!  Literally!  And in fact, you don't need such a big shuttle to make a beaded shuttle bag (Marie tells me a Sewmate is just a good size and I've got some on order).  But you never know when a Tatsy might come in handy so I'm glad I've now got a couple in my "arsenal".

Best wishes,


P.S. Looking back at some of my videos, I think I will eventually re-make the ones on a red background, they are more difficult to see, aren't they?  Actually, when you start making them, you realise how difficult it is to get a good video with a clear close-up, good lighting, the right focus, etc.  I'm still working at it!  Are there any you'd like me to do first?  Are there any I haven't made yet that you'd like to see?

Sunday 15 July 2012

Beaded Shuttle Bag Pattern

Here it is.  This pattern was written by Marie herself.  I only formatted it and added pictures.  So it's all thanks to her.  Her email address is at the top of the pattern if you wish to contact her.

This is the one Marie sent me as a gift.
Tatted in silk.

I took the plunge and bought two Tatsy shuttles especially for this pattern.  I must admit though:  I never thought they would be THAT big!!  They are HUGE.  I think I may have to do a video of what it looks like to tat with one!  Actually, when all loaded up with the beads and enough thread for the whole bag, it's not even half full.  So I need to find another shuttle that is bigger than an Aero but smaller than a Tatsy.  And one that I can buy in the UK.

As you may have noticed, I had to "doctor" the Tatsy though...  I just couldn't work without a hook attached.  Takes just too long to stop, pick up a hook, make the join, put down the hook and then carry on...  So I added some hooks to my Tatsys!


When I first opened the package and saw how big they were, I thought I wouldn't be able to work with them but then I said to myself:  "Don't be so silly, you've got to tame the beast!"  And tame I did.  Can't go as fast as with the Aeros but it's do-able.  Actually, what really takes time is to wind and unwind the shuttles to get one bead at a time for each ring you are making.  But the result is so worth it!


I hope you'll enjoy making these lovely bags and I look forward to seeing other people's versions of it.

Best wishes,

Thursday 12 July 2012

Thank You!

What wonderful people you all are!  Thank you so much for all the lovely suggestions and poetic descriptions.  It's made it really hard to make a choice!
                                                                                                        Motif 12 of 25-motif challenge
Here are all the suggestions:

Minuet
Twisted Chain Snowflake
Locked Wheel/Locked Steering
Mariner Star
Royal Starburst
Splendor
StarFire
Viking Star
Nautical Nuptuals
Enola Star
Ferris Wheel/Ferris Flake
Viking Wheel/Viking Helm
The Moresque
Catherine Wheel
Starburst Snowflake
Nieve del Mar

Aren't they great?

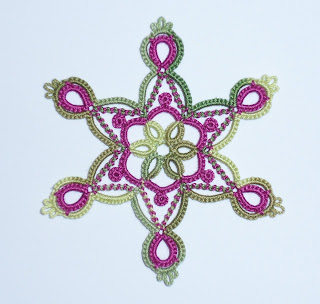
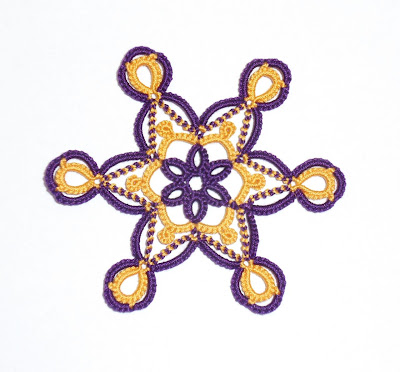
I tatted the motif three more times today in different colours and with slight variations.  I agree with many of you that in the dark purple and gold, it has a nautical feel so I wanted to see how it would look in other colours.  I think you would agree that it doesn't look so nautical in the pink and green for example.

And how about in black and white?
Now I must re-do it in reverse (white in the centre
and black for the round with JKs).


And lastly (for today anyway)
in lime green and turquoise
I changed the tips on this one
and I really like the look
so this alternative version
is included in the pattern.

So the name then... there were honestly many I liked but I loved Julie's description.  Her suggestion was the first and as soon as I saw it, I liked it.  But then I thought, no, wait, and see what everyone else comes up with and many were great.  There were also "votes" for Julie's suggestion within the comments of others so I decided to go with that one.


it is.


Best wishes,

Anybody Inspired?

"Lock Chain Motif" which is what my new pattern is temporarily called is a very boring name!  Is anyone inspired to name the pattern?  It's just about done and ready to go.  If someone comes up with a lovely name I decide to use, they can have the pattern for free.

Does anyone want to play?


Best wishes,

Monday 9 July 2012

I Love Lock Chains!

I recently received my latest purchase from Jess at Tat-ilicious:  some Jade n Salmon thread.  Lovely.  So last night I was playing around, wondering what to make with my new thread.  I thought how much I like lock chains when they are made with two colours... I made a quick sketch of an idea and tatted it straight off!  Never done that before.  One go and there it was.


The thread is gorgeous but as I made it, I thought how much nicer it would look with two different colours instead of a variegated.  So I made this next version in purple and gold.


I just love the look of those lock chains in two colours!


I may add this pattern to my Etsy store.
And it's done in one pass (just the way I like it!)
You could even add picots on the ends and join motifs...
I'll have to give that a try.


And I've not forgotten about the Beaded Shuttle Bags.  That's coming up soon.


Best wishes,

Wednesday 4 July 2012

Beaded Shuttle Bags

If you remember, a little while ago I showed you the wonderful beaded shuttle bag Marie Smith had sent me as a gift.  Of course, I HAD to know how to make them!  Marie kindly shared the pattern with me.  And the pictures just don't do them justice:  these little bags are so wonderfully textured with the roundness of the beads that you have to hold one between your fingers to get how great they are.

I started tatting one straight away but wasn't happy with the first.  So these are the second and third bags I've done.  The grey-blue one still doesn't have its drawcord done.


Here's a close-up that better shows the beadwork.


I made a different ruffle on the blue-grey and will
probably make a different tassel for the drawcord too.


I love these bags and the bead technique would look nice for other projects too (brain cogs in motion...).

Best wishes,