Saturday 31 March 2012

Mystery Solved: Doretha's Teardrop Edging

I'm delighted to report that the previous post brought about the result I had hoped...  I just received a message from Georgia Seitz and it is her own design.  Here is what she said (which can also be seen in the previous post's comments):  "The pattern is found on page 53 of "Tatting on the Edge...and Beyond"which is Book 4 of my Ribbonwinners series. The book is still in print."

The comment was timely as I was just about to post a picture of the completed design.  I will be attaching it to fabric in the centre but don't have anything appropriate at the moment so am just showing you the edging as is.  

Although the picture showed 12 repeats to make a circle, I had to make 17 on mine to make it join without tension.  I used DMC Babylo in size 10 and the doily is 8.5in across.


Thank you Georgia for a beautiful design.

I particularly like being able to tat a nice wide edging like that in one pass!

Best wishes,

Tuesday 27 March 2012

Rachael's Mystery Doily...

There is thread over at In Tatters about this doily pattern.  Rachael had kept a picture of it but there is no reference to where it's from.  Does anyone recognise it?

Wolfgang (also an In Tatters member) kindly wrote up a pattern for it and here is a fragment which I started.  It's a great pattern, done in one pass but with a good width so you could work up a doily quite quickly.  As always, we want to credit the author but he/she needs to be found!

Motif no. 21
Tatted in DMC Babylo size 10

Here is the picture of the pattern:


So can anyone out there can help us solve the mystery?.... 

Oh, and I've learned something new:  a different method to start on a chain which I like better than the paperclip method.  I will ask the author if I can share here and hopefully be able to show you soon.

Best wishes,

Saturday 24 March 2012

Peacock!

I started all over again.  So he's a new chap altogether.  The beak is better this time and I got the body to work(ish), still not completely happy with it though and will have to re-think it for the next version.  I chose a darker turquoise for the body as I thought it was more like a real peacock colour.

But I LOVE the tail!  What a clever combination of motifs to give it that beautiful shape.  I find there is a bit too much contrast in the colours of that variegated and it distracts from the nice shapes in the tail but I thought the blues and greens would be suitable for peacock feathers.  I know which thread I'm going to use for my next try.

Anyway, here he is:

Motif no.20 of 25-motif challenge


I missed quite a few joins in the tail and got his legs wrong too!  But I'm glad I've worked through the whole pattern once and now know where I will make changes for the next time.


I also have to tell you that for the tail, I gave up following the written pattern and just went with the picture on the front cover of the book.  Frankly, in many places it seemed to me that the written pattern didn't say the same as what the picture showed!

Just to show you the pages of notes I took as I worked the pattern...
And they're written on both sides!


He's pretty neat though, isn't he?

Oh, and guess what?  There is a SECOND peacock pattern in the book...

Best wishes,

Tuesday 20 March 2012

Peacock?

Remember mentions of the peacock in the same book that the dancing butterflies are from...  Well, the peacock on the front cover is really what drew my attention to it and made me buy the book.  I tried it once unsuccessfully, put it down and did the butterflies instead.  Last night I thought it was time for another try...  It was looking much better but halfway down the body, it's gone wrong again!  I've been examining the pattern and the diagram and the photo....  I've counted and re-counted...  and my conclusion is that there is a mistake in the pattern.  I can't seem to make it work out if I follow the written pattern (that's if my interpretation of the German directions are correct of course!).  So I've been studying it again and will re-write it how I think it should go to make it look the way it looks in the picture and then tackle the tatting again.

Here's a sneak-peek in the meantime...
Best wishes,

Monday 19 March 2012

Music & Lace

I love our piano.  It's one of my most precious possessions.  I play nearly everyday even if sometimes it's only for a few minutes.  I love the dark shiny wood and the contrasting black and white keys.  I was looking at it the other night thinking I should make it a bit of lace.  I had placed one of my doilies on top with the free edge dangling and I thought it looked really nice.  So I thought I should start a new project.

Time to re-visit Quatrain (see Patterns tab above).  It seemed to me the shape of it would look nice on the edge of our piano.

 Motif no.19

I'm on the 4th motif already BUT, I just realise now
that the lace is going to be in the way of the music books on the stand.

Should I start again with a finer thread?
This of course would take much longer to complete...

Mmmmm...
Needs further consideration.

I also remade a short length of the Butterflies from the previous post in a plain colour:  cream.  I still like it  just as much but now need to find where to use it.  So pretty.

Motif no.20


Best wishes,

Friday 16 March 2012

Dancing Butterflies

I recently treated myself to a few new books so now have many patterns I want to try.  The first one is this really pretty butterfly border pattern from Occhi Schiffchenspitze Frivolité by Marianne Langwieser and Tatiana Scharowa.  As soon as I saw that in the book, I had to make it!

Motif No.18
Click on picture to see it in larger format

Isn't it lovely?

I struggled a bit to start off as the book is written in German so had to try to figure out what the pattern said!  So a bit of trial and error involved but I got there in the end. This is another pattern that provides good practice for the Catherine Wheel Joint.  I can't really tell from the picture in the book (or from the pattern) if that's the join that was used but it does look nicer on the larger wings of the butterfly.

I would call this a slightly challenging pattern, the most difficult part being the antennae with the Josephine knots and the very long picots.  For the second one, you have to start with a long picot, make the JK knot and then carry on the chain with another larger picot and I found it worked out best using two picot gauges on that antennae.  I also ended up twisting mine three times before connecting them as I felt it gave them a nicer look.

I might have to redo this again in a plain colour.  Is the variegated too distracting do you think?  I tried to find the "gentlest" variegated I had... this is a thread I don't think I've used before:  it's Altin Basak 50 in colour 3053.

Best wishes,

Wednesday 14 March 2012

Liebster Blog Award

I was kindly awarded this blog award by Margaret some time last week.  
Thank you!


I have been a bit slow in posting about it because in turn, I need to award it to five other blogs.  They need to be blogs that inspire me but also blogs that have fewer than 200 followers.  I am inspired by many wonderful people but they needed to fit the criteria!  And I was just not finding the time to do that.

My friend Michelle of Tela Magistrae was on my list but Umintsuru (who was also given the award - well deserved!) beat me to it in awarding it to her first!  So here is my five choices:

1.  Tatting Fool makes some lovely tatting and I'm particularly fond of that quote at the top of her blog.
2.  Mariya only started blogging in 2012 and I don't know how long she's been tatting for but already she is coming up with her own patterns and kindly sharing them with us.  I enjoyed tatting her Shamrock recently.
3.  Orsi of Spulni-blog shares a lot of other beautiful needlework (tailored sewing and lately spinning) as well as tatting.  She has created many lovely tatting patterns and designs.  I loved her Napoleon motif which I made and posted about here on my blog.
4.  Filorumars is another blog I've been following and she has a lot of creative ideas which I enjoy.
And finally...
5.  John who does beautiful tatting - recently his Christmas stocking was amazing and I'm enjoying seeing his baby bonnet progress.

There you go.  I will now write to them to let them know and hope they wish to accept the award.

I also have to tell you that in January I was awarded a lovely Versatile Blogger award by Civetta but this required me to list things about myself and award it to 15 other blogs (which seems so many!) and I feel terribly guilty but I still haven't done that....  If Civetta is reading this... I hope she forgives me?


Best wishes,

Sunday 11 March 2012

Green Doily Finished!

This is the doily I ended up with - thought I would go for something a bit different... an elongated diamond shape.  I made 25 medallions (7 with a centre and 18 without) and completed the doily with the border as in the pattern.

Finished Doily:  Motif no.17


It was a beautiful sunny day in the garden today so I took my pictures outside.  I love the combination of purple with green and I think the purple background behind the doily really brings out the brightness of the green.


Hope you're all having a pleasant and relaxing weekend.

Best wishes,

Friday 9 March 2012

The Tischband Leaf Video

Ask and you shall receive... well sometimes anyway!

Diane and Victats commented that they'd like a video on how to do the leaf from Ruth Scharf's Tischband (Tat-Along by Umi & Tsuru).  I hope you're still interested, ladies?


It only appears in this small format on the blog
but if you click on the links below it will take you to YouTube
where you can watch it in larger format.


On another note, I just saw Jane Eborall's latest post about HWT (hand-wound thread) and thought what a great idea!  The possibilities are endless!  Here is a simple, one-shuttle little motif made with three strands of sewing thread:

Motif no.16

Of course, you are aware of the three strands in the picots
but for the stitches, I think it makes a nice firm stitch that looks pretty good.


And here are the three colours I used.


I shall be experimenting some more with this idea.


Best wishes,

Tuesday 6 March 2012

Even Simpler...

I got carried away with this green doily and am nearly done with a second round.  As you can see, I've made this round even simpler than the first, omitting the centre of the medallions.  I thought it would make an interesting visual change.


It would be done by now if I'd stuck with my original idea but hey, sometimes you've just got to "go with the flow".

Best wishes,

Monday 5 March 2012

Sometimes The Simplest Things...

This little motif is simple but effective.  Not a lot of thinking required when making it and the motifs look nice when put together.  This is a pattern by Roger L. aka Freedman which I found on the Needle Tatting website.  I think you may need to be a member to view the pattern but membership is free.

At first I thought I wanted all the square centres to face the same way but although I thought I'd worked it out, I got it wrong on the very first one and then realised it would be very difficult to get them all the same way so I gave up and just attached them randomly.  Hope it comes out looking alright in the end.

Motif no. 15
This is the first one I made and though you can't tell on the picture,
there was too much tension (for me) between the centre medallion 
and the outer round so I added some stitches to the centre
before making more motifs.


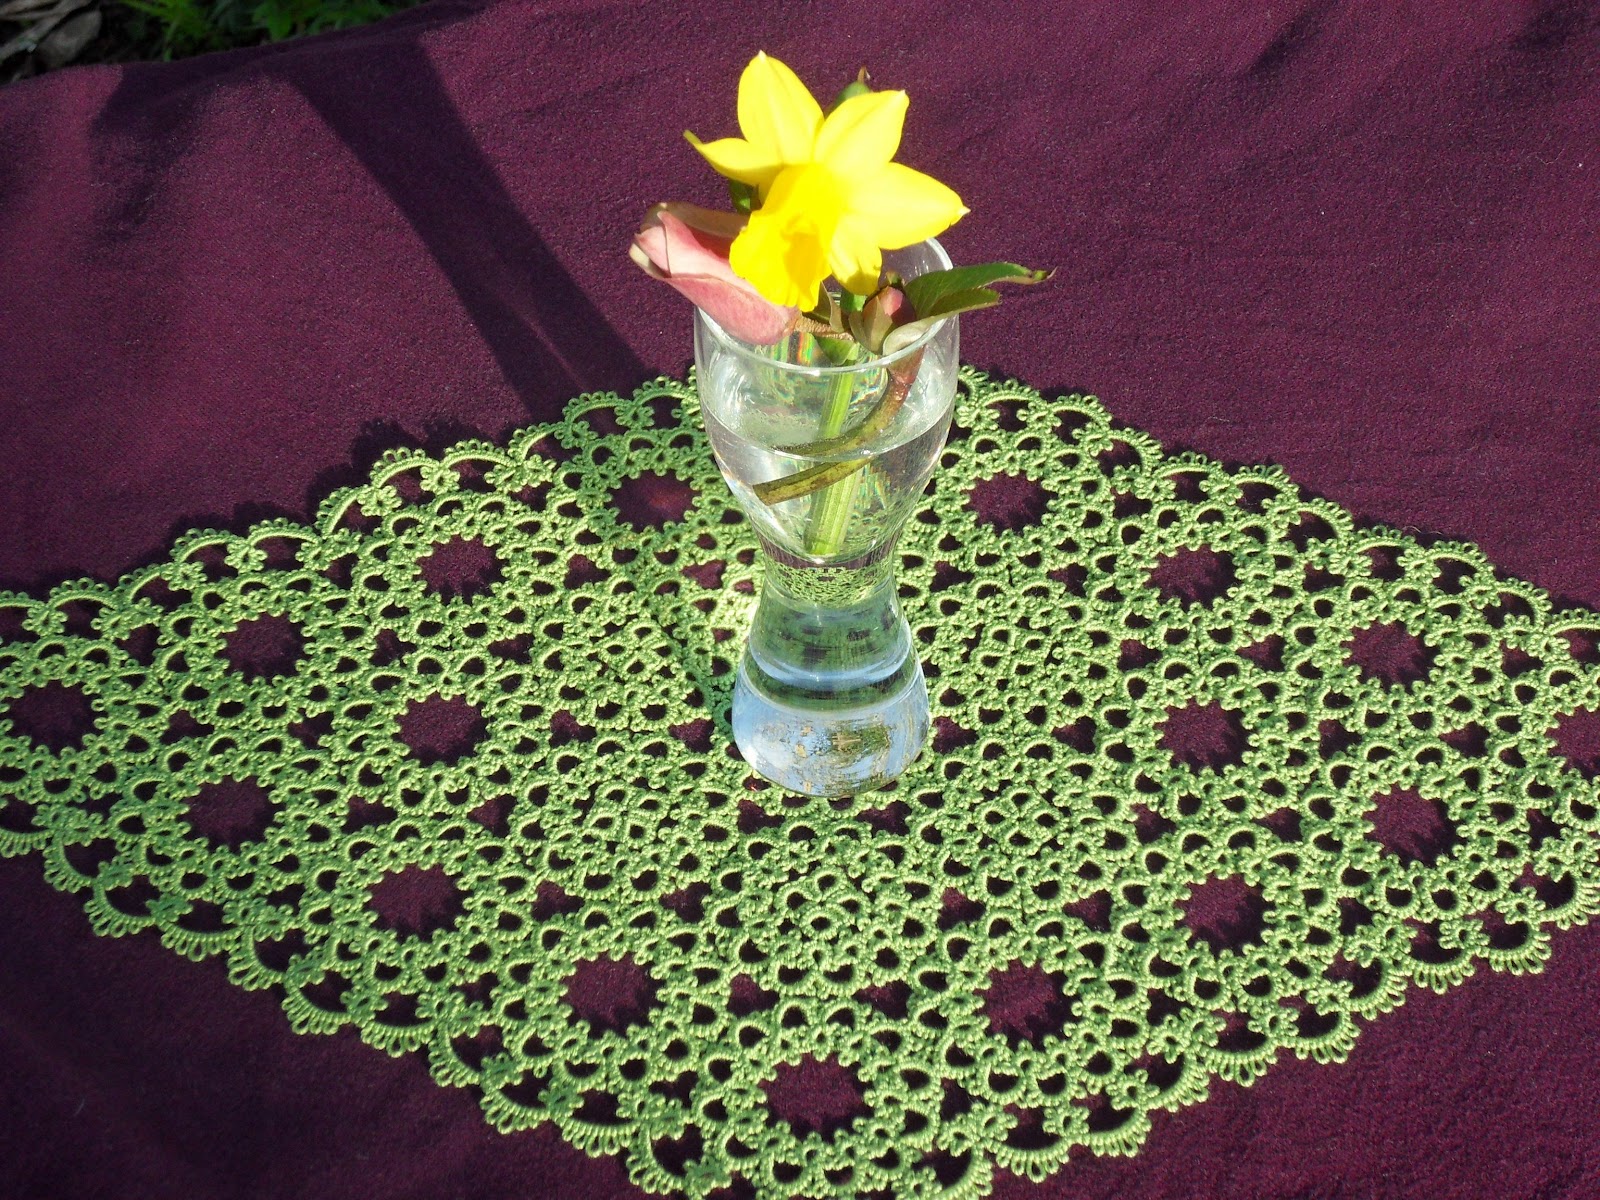
And this is where I'm at so far:


And finally, I'm adding this smaller, darker photo (below) because
I like the negative spaces that form when you join the motifs.
Can you see the nice flower/star shape
that appears around the centre medallion?
I like things like that.

It's a neat thing about tatting that it's not just what you tat that looks nice,
it's also what you don't tat!  Cool, n'est-ce pas?


I'm not going to go very large with this one, probably just adding two more motifs, one each end to give it an "ovalish" shape as in the pattern sample.

On another note, after what I said in my last post, I got my Iris Niebach doily book out thinking I was going to have to tackle one next... but mmmmmmm.... I still find them too daunting.  I look at the diagrams and it seems to me to require such a lot of thinking to figure out which way to go and which elements to do in which order (even with the few arrows provided).  So I put my book away again.  For now.  Might get around to it eventually.

Best wishes,

Thursday 1 March 2012

Niebach Elegance

Yesterday I was having a look at some of the pictures in the albums at In Tatters (always inspiring) and came upon this design very nicely tatted by Telefonky.

It's an Iris Niebach design which is available free here.

I have to say that I have a book of Iris Niebach's doilies but personally find her diagrams hard to follow.  I tried a couple of times with the doilies, got lost and gave up (Oh no!!  Now I've said that, I will have to tackle one next because I can't bear to give up!!  I can't be beaten by a pattern!).

Anyway, I was struck by the elegance of this motif and had to make it.  I find it graceful.

No.14 of 25-motif challenge

The centre hearts are a little fiddly to make
but overall it's a straightforward design to tat.

Do you like it?

Best wishes,